The Magic of Burn Away Cake
If you’ve spent more than five minutes on social media lately, you’ve definitely seen them: a tiny flame hits the top of a cake, the surface vanishes in a flash of fire, and a hidden message appears underneath. It’s 2026, and burn-away cakes have officially taken over as the internet’s favorite dessert.
Why Everyone Is Obsessed with Burn Away Cake
The real pull of these cakes is the element of surprise. It starts out looking like any other beautifully frosted dessert, but then it “transforms.” Whether it’s a cheeky birthday joke, a heartfelt proposal, or a high-stakes gender reveal, the reveal is always a showstopper. It’s the kind of moment that makes everyone at the table pull out their phones to hit record.
More Than Just a Viral Video
Beyond the “wow” factor, there’s actually some pretty cool science and craftsmanship involved. These cakes use a specific layering technique—combining standard frosting with edible printing and thin wafer paper—to turn a simple treat into a full-on experience.
Whether you’re looking to bake your first one at home or you’re trying to track down a local bakery that can pull off the perfect reveal, we’ve got you covered. This guide will walk you through the gear you need and the steps to make it happen.
Why Burn Away Cake is Absolutely Killing it in 2026
Every few years, a dessert trend comes along and just takes over the internet. Right now, it’s Burn Away Cake—and honestly, nothing else even comes close.
It’s not just about the cake; it’s about the reveal of the Burn Away Cake.
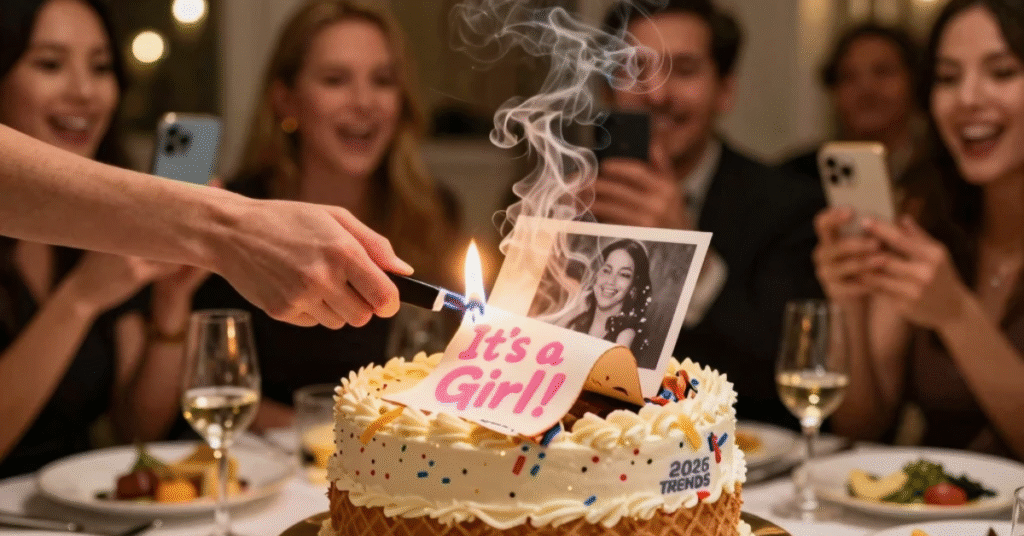
Picture the scene: The cake is sitting there, looking perfectly normal. Then, someone lights the edge. A tiny flame sweeps across the top layer like a curtain lifting, and suddenly—boom—a hidden message appears out of nowhere. It’s pure cinematic magic, which is exactly why your TikTok and Insta feeds are probably buried in them right now.
The Best Ways People are Using Them:
-
Birthday Plot Twists: An “Old” photo burns away to reveal a “Happy Birthday” message.
-
The Ultimate Gender Reveal: Burning off the mystery to show pink or blue.
-
The “Marry Me?” Moment: Proposals that literally start with a spark.
-
Chaotic Energy: Inside jokes or “roasts” hidden under a pretty exterior.
In a world where everyone’s looking for that one “viral” moment for their feed, these cakes are the MVP. They turn a simple dessert into an actual experience that people actually remember (and record).
So, What Exactly is a Burn-Away Cake?
At first glance, it just looks like a standard, pretty cake. But the “magic” is all in the double-layer setup on top. It’s basically a high-tech version of a magic trick, but edible.
The Two-Layer Secret of Burn-Away Cakes
Think of it like a “reveal” screen for your dessert:
-
The “Burn” Layer (The Top): This is a super-thin sheet of wafer paper. It’s made from potato starch, which is the secret sauce here because it catches fire and vanishes in seconds without making a mess.
-
The “Reveal” Layer (The Bottom): Underneath that is your actual message or photo, usually printed on a thicker frosting sheet. Since frosting sheets don’t burn like paper, they stay perfectly intact while the top layer disappears.
Whether it’s a “Happy Birthday,” a “Marry Me?”, or a “Surprise, it’s a Girl!”, the cake itself stays totally safe and ready to eat.
Wafer Paper vs. Rice Paper: Why the Material Matters
If you’re trying this at home, don’t grab just any edible paper. Pros always go for Wafer Paper.
-
Wafer Paper is the MVP because it’s lightweight, burns fast, and doesn’t leave a weird smell or a bunch of smoke in the room.
-
Rice Paper, on the other hand, is a bit of a nightmare for this. It’s too thick, burns unevenly, and—honestly—smells kind of funky when it catches fire.
That’s why wafer paper is the gold standard for getting that clean, “now you see it, now you don’t” viral moment.
The Actual “Science” Behind the Burn
It looks a little chaotic—lighting your dessert on fire usually is—but there’s actually some pretty solid logic making it work. If you’re worried about melting your masterpiece, here’s why it actually stays perfectly safe.
1. The Buttercream “Firewall.”
Think of the thick ring of frosting around the edge as a safety border. This buttercream wall isn’t just for decoration; it acts as a literal buffer. It keeps the flame contained on the top layer and prevents the fire from ever touching the actual cake surface.
2. The “Flash Burn” Effect
The secret is in the speed. Because wafer paper is so thin and light, it burns through in a matter of seconds. It’s a “flash burn”—it’s over so fast that the heat doesn’t even have time to transfer to the frosting underneath. It’s basically gone before the cake even realizes what happened.
3. The Big Chill
Professional bakers have one golden rule: Always chill the cake first. By popping the cake in the fridge before the big reveal, the buttercream stays firm and cold. This creates a heat-resistant base that protects the hidden image, making sure the only thing that “melts away” is the paper, not your hard work.
Once you get the hang of these three things, the “fear factor” totally disappears. It’s less about playing with fire and more about smart layering.
How to Nail the Burn-Away Cake (The DIY Masterclass)
Making one of these at home is actually way more doable than it looks. You don’t need a degree in pyrotechnics; you just need a solid plan. Here’s the play-by-play.
Step 1: Build a Solid Foundation
Don’t go for a super crumbly or soft cake. You need something that can hold its own—think Vanilla Sponge, Chocolate Fudge, or Red Velvet.
-
Pro Tip: Level your layers so they’re flat, hit it with a crumb coat, and chill it for 30 minutes. A cold, firm base is your best friend here.
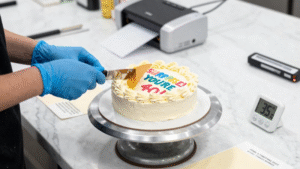
Step 2: Set the Hidden Stage
The “bottom” layer is where the secret lives. This should be an edible frosting sheet (not wafer paper).
-
You can print a custom photo, a “Happy Birthday” message, or even a “Level Up” graphic. This is the part people will be screaming about once the fire clears.
Step 3: Build the “Safety Wall”
This is the most important part. Pipe a thick ring of buttercream around your hidden image. Think of it like a dam.
-
Leave about an inch or so of space between the image and the edge. This creates the “burn zone” and keeps the fire away from the actual sides of the cake.
Step 4: The “Floating” Top Layer
Now, gently place your wafer paper on top of that buttercream ring.
-
Keep your hands bone-dry. Any moisture will ruin the wafer paper before you even get the lighter out. You want it sitting perfectly flat across that frosting border like a drum skin.
Step 5: The “Big Moment”
Grab a long-reach lighter (don’t use a tiny thumb lighter—save your fingers!). Ignite one corner and watch the magic happen.
-
The paper will flash-burn across the top in about 3 to 5 seconds, revealing the message underneath.
The #1 Question: Does it taste like smoke? Honestly? No. The wafer paper is so thin and burns so fast that it doesn’t leave any “burnt” flavor behind. Your frosting will still taste like frosting, and your cake will still be 10/10.
The Pro’s Kit: What You Actually Need
You can’t just wing a burn-away cake with standard pantry staples. You need a mix of classic baking tools and some “special ops” gear for the fire show.
The Shopping List
-
The Basics: Cake flour, baking powder, eggs, unsalted butter, and vanilla.
-
The Magic Ingredients: High-quality buttercream frosting, an edible frosting sheet (for the bottom), and wafer paper (for the top).
-
The Gear: A cake turntable, offset spatula, bench scraper, an edible ink printer (or a local shop that prints for you), and a long-reach lighter.
Pro-Chef Secrets for a Flawless Reveal
If you want that “clean” burn you see on TikTok, you have to follow the unwritten rules of the pros:
-
The Deep Chill: Never light a room-temperature cake. Cold frosting keeps the wafer paper bone-dry. If the frosting is warm, the paper gets soggy, and instead of a cool flash-burn, you’ll just get a sad, smoldering mess.
-
The “Piping Gel” Hack: A thin layer of piping gel acts as a moisture barrier. It keeps your hidden image looking vibrant and sharp until the big reveal.
-
Don’t Cheap Out on Paper: Low-grade wafer paper is a nightmare—it smokes too much and burns unevenly. Spend the extra couple of dollars on the premium stuff for that “blink-and-you-miss-it” fire effect.
Where to Score a Burn-Away Cake
Not a baker? No worries. But don’t expect to find these at your local grocery store just yet.
-
The Big Guys (Walmart/Publix): Generally, no. While places like Walmart might do basic edible prints, they aren’t set up for the “burn” technique. Some independent bakers working at these stores might help you out of the clock, but it’s not a standard menu item.
-
Boutique Bakeries: This is where the magic happens. If you’re in a major city, just search for “Burn-away cakes [Your City]”. Specialist shops in places like NYC, Chicago, or Sydney are currently dominating this trend and can handle the custom printing for you.
Burn-away Cake Prices: What Should You Expect?
Prices vary depending on size and customization.
Typical price ranges look like this:
Cake Size Average Price 6 inch $40 – $80 8 inch $60 – $120 10-inch custom $120 – $250 Factors affecting cost include:
-
edible printing
-
bakery reputation
-
complex designs
-
custom messages
Highly detailed designs often increase the price.
When to Bring Out the Fire: Best Occasions
The “reveal” is pure drama, which makes these cakes the undisputed GOATs of 2026 celebrations.
-
Gender Reveals: Skip the confetti cannons. Start with a neutral “He or She?” on top, then burn it away to reveal a bright blue or pink message underneath.
-
The Big Question: Imagine a “Happy Anniversary” cake that burns away to reveal “Will You Marry Me?” It’s an instant tear-jerker.
-
Milestone Roasts: For 30th or 40th birthdays, hide a “You’re Officially Old” or an inside joke under a classy exterior. It’s the perfect way to get a laugh.
Keeping It Fresh: Storage & Flavor
You’ve put in the work, so don’t let a soggy cake ruin the show.
-
Pro Storage: Keep the cake in the fridge until about 30 minutes before the reveal. Humidity is the enemy of wafer paper—if it gets damp, it won’t burn.
-
Flavor Game: Since the “burn” doesn’t affect the taste, go wild with your pairings. Chocolate with Raspberry, Vanilla Bean with Strawberry, or a classic Red Velvet with Cream Cheese all work perfectly.
- Learn More
The Final Bite
A cake isn’t just a dessert anymore; it’s the highlight of the night. Whether it’s a birthday joke or a life-changing announcement, that 5-second “burn” creates a memory (and a video) that lasts way longer than the cake itself.
-
- Learn More
-
Pro Baker’s Challenge: Want to really blow minds? Try a Double Reveal. Layer two wafer sheets with different messages so the first burn reveals a joke, and the second reveal shows the real surprise.